Matt Ward

Paket Support in Xamarin Studio

Xamarin Studio and MonoDevelop now have support for Paket with an alpha release of the Paket Addin.

Paket is a dependency manager for .NET. The dependencies it supports are NuGet packages, files from GitHub, Gists or files from any HTTP source. Paket can be used to maintain project dependencies completely from the command line.

So let us take a look at the support for Paket in Xamarin Studio and MonoDevelop.

Features

  • View dependencies and referenced NuGet packages in the Solution window.
  • Add, remove, update NuGet packages from the Solution window.
  • Install, restore, simplify NuGet packages from the Solution window.
  • Check for updated NuGet packages from the Solution window.
  • Syntax highlighting for all paket files.
  • Code completion whilst editing the paket.dependencies file.
  • Integrates with Xamarin Studio’s unified search.
  • paket.dependencies and paket.template file templates.

Installing the addin

The addin is currently available from MonoDevelop’s Add-in Repository in the alpha channel. In Xamarin Studio open the Add-in Manager and select the Gallery tab. Click the repository drop down and if Xamarin Studio Add-in Repository (Alpha Channel) is not displayed then click Manage Repositories…. In the window that opens tick the check box next to Xamarin Studio Add-in Repository (Alpha Channel) and then click the Close button.
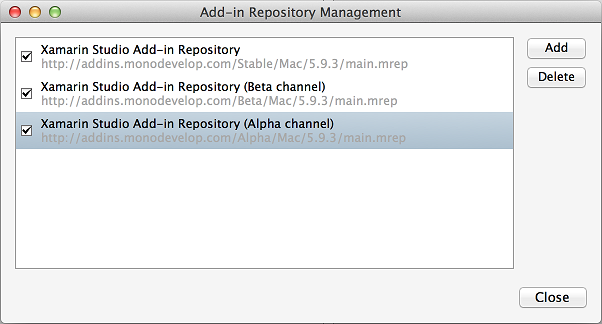
Enabling alpha channel addins

Back in the Add-in Manager dialog click the Refresh button to update the list of addins. Use the search text box in the top right hand corner of the dialog to search for the addin by typing in Paket.
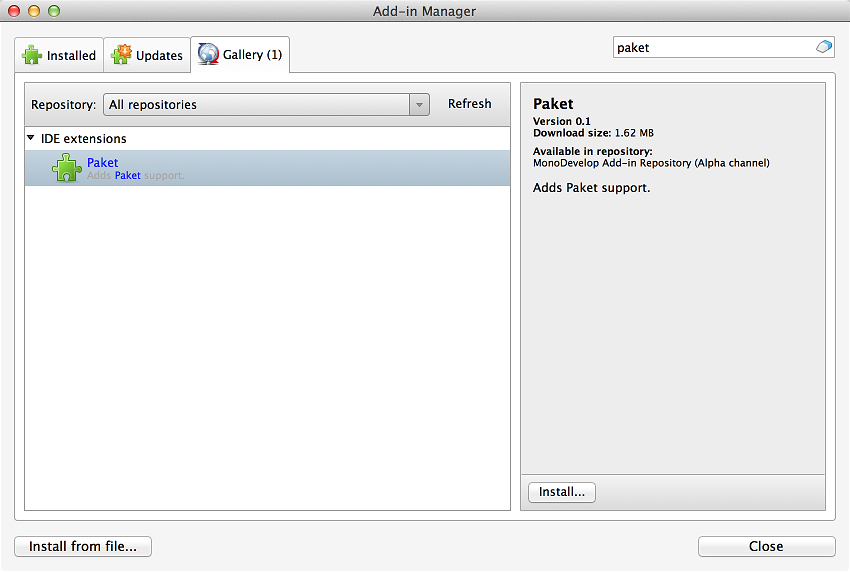
Paket addin selected in Addin Manager dialog

Select the Paket addin and then click the Install… button.

Now let us take a look at adding a NuGet package to your project with Paket. This is a simple way to get started with Paket in Xamarin Studio without having to manually create any paket files.

Adding a NuGet Package

To add a NuGet package using Paket, right click the project in the Solution window, and select Add – Add NuGet Packages using Paket.
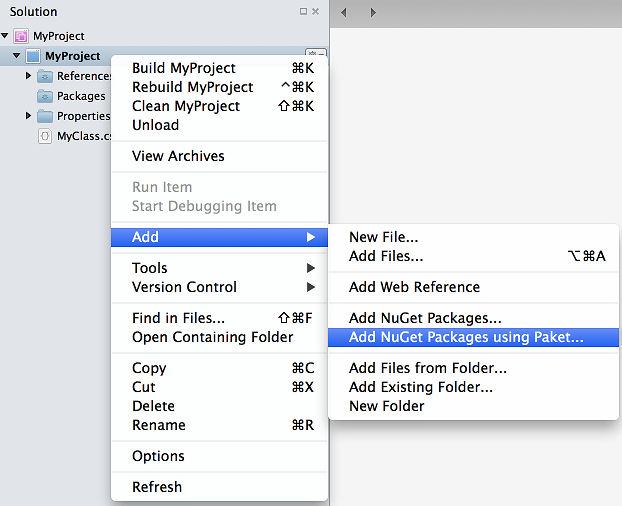
Add NuGet Package using Paket Solution window context menu

The Add NuGet Packages using Paket menu is also available from the main Project menu.

This opens the Add NuGet Packages dialog. Search for the NuGet package you want to use and click the Add Package button.
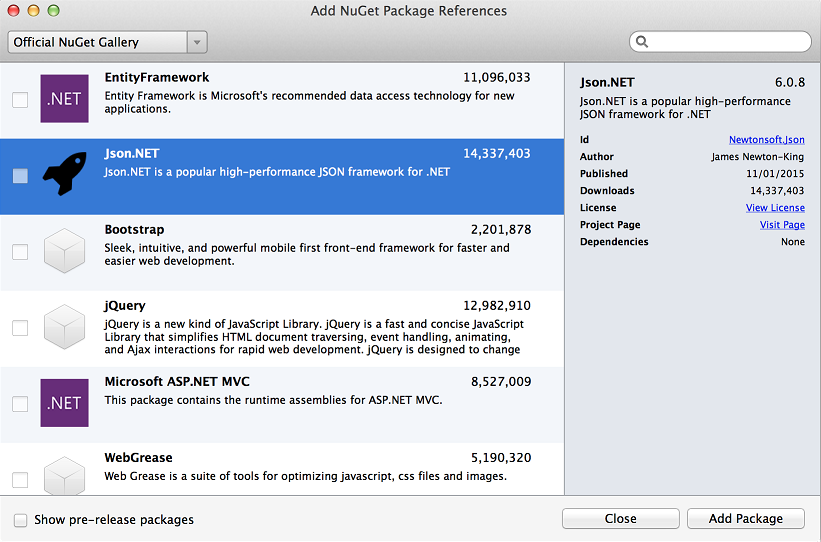
Add NuGet Packages dialog

The Status Bar will update as the NuGet package is installed.

Json.NET added status bar message

More detailed information about the installation can be found in the Paket Console window. This can be opened by clicking the Status Bar or from the View – Pads menu.

Json.NET added Paket Console messages

After the NuGet package has been installed successfully you will see two new items in the Solution window. A Paket Dependencies folder and a Paket References folder.
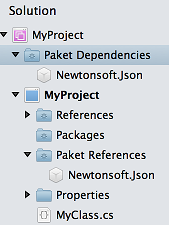
Paket folders in Solution window

These folders show the NuGet packages that are in the paket.dependencies and paket.references files.

Paket Dependencies Folder

The Paket Dependencies folder is shown in the Solution window if Xamarin Studio finds a paket.dependencies file in the same directory as the solution. The NuGet packages that are in the paket.dependencies file are shown under this folder.

Paket Dependencies folder in Solution window

Double clicking the folder will open the paket.dependencies file into the text editor. The Paket Dependencies folder also has a context menu where you can run Paket commands.
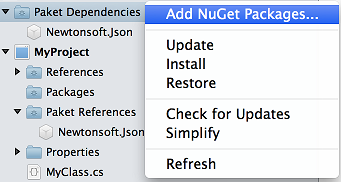
Paket Dependencies folder context menu

From the context menu you can Add a NuGet Package as a dependency, install, restore, update, and simplify your dependencies, or check for updates. When you select Check for Updates the updated NuGet package information will be shown in the Paket Console and in the Solution window.

Paket Dependencies folder NuGet package update information

To update a single NuGet package you can right click it and select Update. To remove the NuGet package as a dependency you can right click it and select Remove or press delete.
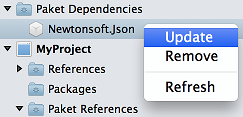
Paket Dependencies folder NuGet package context menu

Paket References Folder

The Paket References folder is shown in the Solution window if Xamarin Studio finds a paket.references file in the same directory as the project. The NuGet packages that are in the paket.references file are shown under this folder. Double clicking the folder will open the paket.references file into the text editor.

Paket References folder in Solution window

Right clicking the Paket References folder allows you to add a NuGet package to the project.

Paket References folder context menu

A NuGet package can be removed by right clicking it and selecting Remove or by pressing Delete.

Paket References folder NuGet package context menu

Code Completion

When editing the paket.dependencies file you will get code completion as you type. You can also bring up the code completion list by pressing Ctrl+Space.
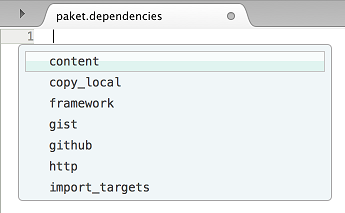
paket.dependencies file keyword completion

Keywords that have an associated value will also show code completion after a space is pressed or the first character is typed in.

paket.dependencies file keyword value completion

After the source keyword you will see a list of NuGet package sources that are defined in your NuGet.Config file.

paket.dependencies file NuGet source completion

After the nuget keyword you will see a list of NuGet packages.

paket.dependencies file NuGet package completion

This list of NuGet packages is currently taken from your local machine’s NuGet cache. Currently there is no support for asynchronously searching an online NuGet package source to get the list of NuGet packages.

Running Paket commands

Paket commands can be run from the Unified search. If you type in paket you will see some of the Paket commands.
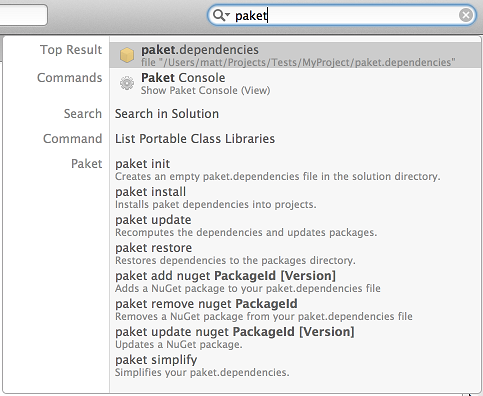
Paket commands in unified search

The syntax for each command is the similar to what the paket.exe console application supports but the commands do not support all the parameters.

As you type more of the command the list of commands will be filtered. To run a command select it and then press the enter key. These commands directly run paket.exe and update the paket files and project files. The status of the current command is shown in the Status Bar and the output from paket.exe is shown in the Paket Console window.

Paket dependencies installed status bar message

Paket dependencies installed console message

The Paket Console window will automatically be displayed if there was an error running a command and an error message will be displayed in the Status Bar.

Paket error message in Status Bar

Paket console error message

Otherwise you can open the Paket Console by clicking the Status Bar.

Syntax highlighting

Syntax highlighting is available for all paket files – paket.dependencies, paket.references, paket.lock and paket.template.

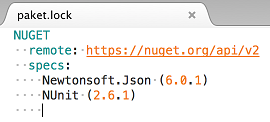
paket.dependencies file syntax highlighting

paket.lock file syntax highlighting

This brings us to the end of the introduction to Paket support in Xamarin Studio.

NuGet Support in Xamarin Studio 5.9.2

Changes

  • NuGet 2.8.5 support
  • NuGet warning and error messages in Status Bar

More information on all the changes in Xamarin Studio 5.9.2 can be found in the release notes.

NuGet 2.8.5 support

Xamarin Studio now supports NuGet 2.8.5.

NuGet 2.8.5 adds support for three new .NET target frameworks: DNX, DNXCore and Core.

With NuGet 2.8.5 supported you can now install the latest pre-release version of xUnit.

NuGet warning and error messages in Status Bar.

Xamarin Studio 5.9 has a new native Status Bar on the Mac. This new Status Bar has a smaller width so the NuGet warning and error messages could be too long to be displayed. The screenshots below show a NuGet warning and error message in Xamarin Studio 5.9 that do not fit in the Status Bar.

NuGet warning message truncated in status bar

NuGet error message truncated in status bar

In Xamarin Studio 5.9.2 the NuGet Status Bar messages have been shortened so they can be displayed in the new Status Bar without being truncated. The screenshots below show the new format of the NuGet warning and error messages shown in the Status Bar.

Shortened NuGet warning message in status bar

Shortened NuGet error message in status bar

Xamarin Components Directory Configuration

One of the new features introduced in Xamarin Studio 5.9 is the ability to configure the directory where Xamarin Components are installed to when they are added to a project.

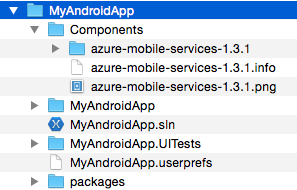
By default, when a Component from the Xamarin Component store is added to a project, the Component is installed to a Components directory inside the solution’s directory.

Default Components directory for a solution

The project will have references added that refer to assemblies inside this Components directory.

<Reference Include="Microsoft.WindowsAzure.Mobile.Ext">
  <HintPath>..\Components\azure-mobile-services-1.3.1\lib\android\Microsoft.WindowsAzure.Mobile.Ext.dll</HintPath>
</Reference>
<Reference Include="Microsoft.WindowsAzure.Mobile">
  <HintPath>..\Components\azure-mobile-services-1.3.1\lib\android\Microsoft.WindowsAzure.Mobile.dll</HintPath>
</Reference>
<Reference Include="Newtonsoft.Json">
  <HintPath>..\Components\azure-mobile-services-1.3.1\lib\android\Newtonsoft.Json.dll</HintPath>
</Reference>
<Reference Include="System.Net.Http.Extensions">
  <HintPath>..\Components\azure-mobile-services-1.3.1\lib\android\System.Net.Http.Extensions.dll</HintPath>
</Reference>
<Reference Include="System.Net.Http.Primitives">
  <HintPath>..\Components\azure-mobile-services-1.3.1\lib\android\System.Net.Http.Primitives.dll</HintPath>
</Reference>

If a project is shared between multiple solutions then Xamarin Studio can have multiple different Components directories, one for each solution. This can cause Xamarin Studio to modify the hint paths in the project file to use a different Components directory depending on which solution was opened.

A simple way to reproduce this problem is to create one solution with a project that has a Component, then create another solution in a different directory, and add the same project to this new solution. The Component will be downloaded again into the Components directory relative to the new solution and the assembly references in the project file will be modified to use this new Components location.

Now let us take a look at how to solve this problem by configuring the Components directory.

Configuring the Components Directory

To configure the Components directory used by a project you can use a components.config file, as shown below.

<components>
  <config>
    <add key="cachePath" value="..\Components" />
  </config>
</components>

The path specified in the components.config file can be a full path or a relative path. If it is a relative path then it is relative to the directory containing the components.config file.

The path in the components.config file will be normalized so it contains the correct directory separators on non-Windows operating systems, so you can use either a forward slash or a backslash in the path.

Now let us take a look at how Xamarin Studio finds this components.config file.

Xamarin Studio, when a solution is opened, will check for a components.config file in several locations based on the solution’s directory. If we have a solution in the directory /Users/matt/Projects/MyAndroidApp/ then the full set of locations checked is as follows:

  1. /Users/matt/Projects/MyAndroidApp/.components/components.config
  2. /Users/matt/Projects/MyAndroidApp/components.config
  3. /Users/matt/Projects/components.config
  4. /Users/matt/components.config
  5. /Users/components.config
  6. /components.config
  7. ~/Library/Preferences/Xamarin/Components/components.config

Note that on Windows the last location checked is:

%AppData%\Xamarin\Components\components.config

If you put the components.config file in a directory that is a parent of multiple solutions then all the solutions can use this common components.config file.

If the components.config file is missing or cannot be read then the default Components directory is used, which is inside the solution’s directory.

If there is an error whilst reading the components.config file then the error will be logged by Xamarin Studio and the default Components directory will be used.

The Components directory to be used is cached when the solution is loaded so changes made to the components.config file require the solution to be closed and re-opened before Xamarin Studio will use the new settings.

To help diagnose problems when configuring the Components directory Xamarin Studio will log information in the Components.log file. The Components.log file can be found by selecting Open Log Directory from Xamarin Studio’s Help menu. Two examples taken from the Components.log file are shown below. The first example shows the message logged when a components.config file cannot be found.

[2015-05-10 11:00:29.0] DEBUG: No components.config file found. Using default path. Files checked: /Users/matt/Projects/MyAndroidApp/.components/components.config
/Users/matt/Projects/MyAndroidApp/components.config
/Users/matt/Projects/components.config
/Users/matt/components.config
/Users/components.config
/components.config
/Users/matt/Library/Preferences/Xamarin/Components/components.config

The next example shows the message logged when a components.config file is found.

[2015-05-10 11:10:24.1] DEBUG: Using custom components cache path '/Users/matt/Projects/MyAndroidApp/Components'. components.config file found at '/Users/matt/Projects/MyAndroidApp/components.config'.

Component Restore

The latest version of xamarin-component.exe also supports using the configured Components directory. Its restore command will restore the Components to the directory as specified in the components.config file.

mono xamarin-component.exe restore path/to/solution.sln

xamarin-component.exe will look for the components.config file in the same directories as Xamarin Studio.

Comparison with NuGet

NuGet has similar behaviour to Components in Xamarin Studio. All NuGet packages are downloaded to a packages directory inside the solution directory by default. To override this behaviour you can create a NuGet.Config file. The NuGet.Config file allows the packages directory to be configured through a repositoryPath setting.
<configuration>
  <config>
    <add key="repositoryPath" value="../../packages" />
  </config>
</configuration>

NuGet will look for this NuGet.Config file in several places. Assuming the solution directory is /Users/matt/Projects/MyAndroidApp/ the NuGet.Config file will be looked for in the locations as shown below:

  1. /Users/matt/Projects/MyAndroidApp/.nuget/NuGet.Config
  2. /Users/matt/Projects/MyAndroidApp/NuGet.Config
  3. /Users/matt/Projects/NuGet.Config
  4. /Users/matt/NuGet.Config
  5. /Users/NuGet.Config
  6. /NuGet.config
  7. ~/.config/NuGet/NuGet.Config (Windows: %AppData%\NuGet\NuGet.Config)

NuGet Support in Xamarin Studio 5.9

Changes

  • NuGet 2.8.3 support
  • Always show Packages folder in Solution window
  • Target framework change detected on project reload

More information on all the new features and changes in Xamarin Studio 5.9 can be found in the release notes.

NuGet 2.8.3 support

Xamarin Studio now supports NuGet 2.8.3. This allows a NuGet package to target NuGet 2.8.3 explicitly. For example the PCLStorage 1.0.1 NuGet package will not install into Xamarin Studio 5.8, since it requires NuGet 2.8.3, but will install into Xamarin Studio 5.9.

NuGet packages, such as xunit, that target the new ASP.NET target frameworks, ASP.NetCore 5.0 and ASP.Net 5.0, can now be installed into Xamarin Studio now that it supports NuGet 2.8.3. Previously you would see an error message in the Package Console window:

'xunit.core' already has a dependency defined for 'xunit.extensibility.core'.

Support for NuGet 2.8.5 is planned for Xamarin Studio 5.9.1.

Always Show Packages Folder in Solution window

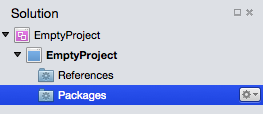
The Packages folder is now always shown in the Solution window even if the project has no NuGet packages. Previously the Packages folder would only be shown if one or more NuGet packages were installed in a project.

Packages folder in Solution window

Target Framework Change Detected on Project Reload

Xamarin Studio will detect a project file has been changed outside of Xamarin Studio and will reload the project. Now Xamarin Studio on reloading will detect the project’s target framework has been changed and will check the NuGet packages are compatible with the new target framework. Previously Xamarin Studio would only check the compatibility of NuGet packages if the target framework was changed from within Xamarin Studio via the project options.

This allows Xamarin Studio to check the NuGet packages are compatible when an iOS Classic project is converted to an iOS Unified project using Xamarin Studio’s migration tool. The NuGet packages, such as Xamarin.Forms, can then be retargeted by Xamarin Studio using the Retarget menu.

TypeScript Support in Xamarin Studio

Xamarin Studio and MonoDevelop now have support for TypeScript on Linux, Mac and Windows with an alpha release of the TypeScript Addin.

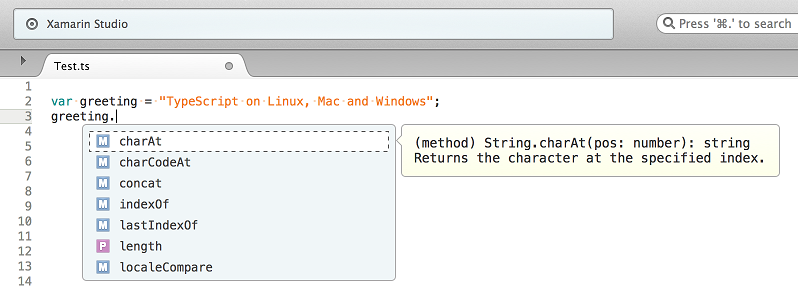
Editing TypeScript in Xamarin Studio on the Mac

The TypeScript addin uses V8.NET which is a library that allows a .NET application to host Google’s V8 JavaScript engine and have JavaScript interact with .NET objects in the host application.

The ability to support Windows, Mac and Linux would not have been possible without the work done by James Wilkins and Christian Bernasko. James Wilkins created the V8.NET library and when it was first released it supported only Windows. Christian Bernasko then took V8.NET and modified it to make it work with Mono on Linux and the Mac. The TypeScript addin is using V8.NET binaries built by Christian from his port of V8.NET.

Please note that this is an alpha release and because V8.NET uses a native library it can cause Xamarin Studio or MonoDevelop to terminate if a bug is encountered.

Features

  • TypeScript compilation on save or build.
  • Code completion.
  • Find references.
  • Rename refactoring.
  • Go to declaration.
  • Errors highlighted as you type.
  • Code folding.

The addin supports:

  • Xamarin Studio MonoDevelop 5 and above.
  • TypeScript 1.4
  • Linux, Mac and Windows.

Installing the addin

The addin is currently available from MonoDevelop’s Add-in Repository in the alpha channel. By default the alpha repository is not enabled so you will have to enable it before you can find and install the addin.

In Xamarin Studio open the Add-in Manager and select the Gallery tab. Click the repository drop down and if Xamarin Studio Add-in Repository (Alpha Channel) is not displayed then click Manage Repositories…. In the window that opens tick the check box next to Xamarin Studio Add-in Repository (Alpha Channel) and then click the Close button.

Enabling alpha channel addins

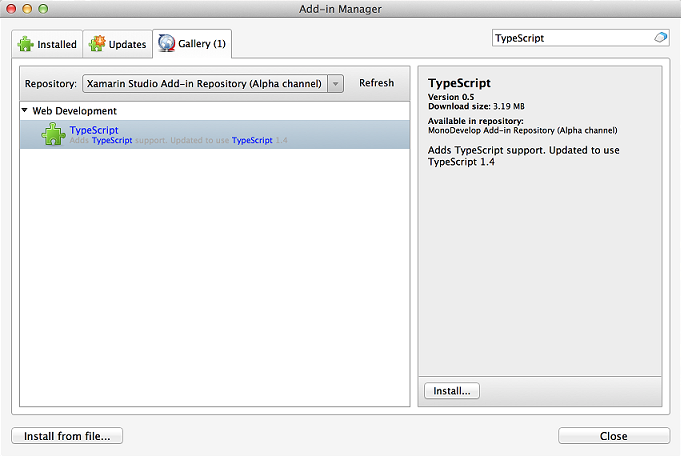
Back in the Add-in Manager dialog click the Refresh button to update the list of addins. Use the search text box in the top right hand corner of the dialog to search for the addin by typing in TypeScript.

TypeScript addin selected in Addin Manager dialog

Select the TypeScript addin and then click the Install… button.

Note that if you are using Linux 32 bit then you should install the TypeScript Linux 32 bit addin. The other TypeScript addin listed supports Linux 64 bit. Hopefully in the future it will be possible to support both Linux 32 bit and 64 bit using the same addin.

Getting Started

Now that the TypeScript addin is installed let us create a TypeScript file.

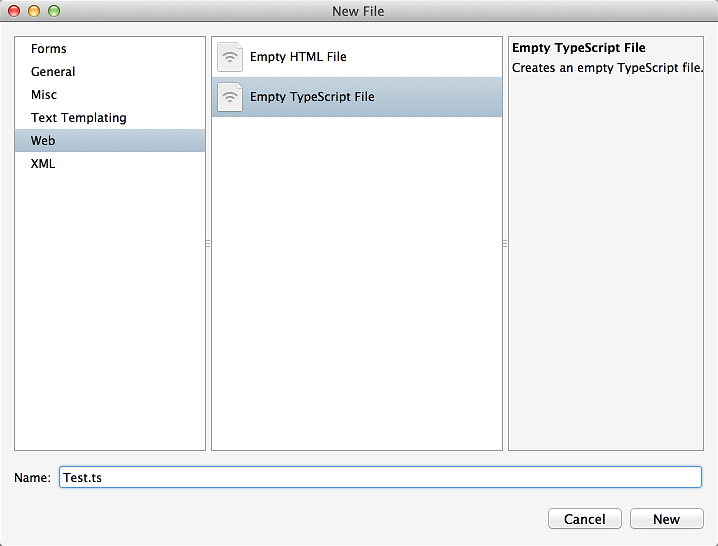
To add a TypeScript file open the New File dialog, select the Web category and select Empty TypeScript file.

New File Dialog - New TypeScript File

Give the file a name and click the New button.

Note that currently the TypeScript file needs to be included in a project. Standalone TypeScript project files are not supported. TypeScript files can be added to any .NET project.

Code Completion

When editing the TypeScript code you will have code completion when you press the dot character.

TypeScript dot code completion

Code completion also works when you type the opening bracket of a function.

TypeScript method completion

Go to Declaration

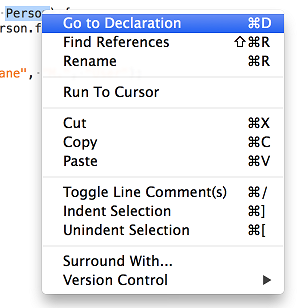
The text editor’s right click menu has three TypeScript menus: Go to Declaration, Find References and Rename.

Text editor context menu with TypeScript menu options

The Go To Declaration menu option will open the corresponding definition in the text editor.

Find References

Find References will show the references in the Search Results window.

TypeScript references shown in Search Results window

Rename

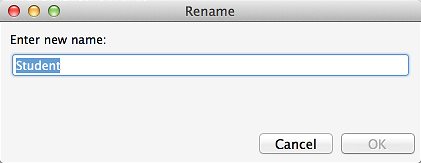
Selecting the Rename menu option in the text editor will open the Rename dialog where you can type in a new name and click OK to have it updated.

TypeScript rename dialog

Note that currently on Linux the Rename dialog will only be displayed if the keyboard shortcut F2 is used. Selecting the context menu will not show the Rename dialog on Linux but will work on Windows and on the Mac.

Error Highlighting

Errors in your TypeScript code will be highlighted as you are typing in the text editor.

TypeScript errors highlighted in text editor

Code Folding

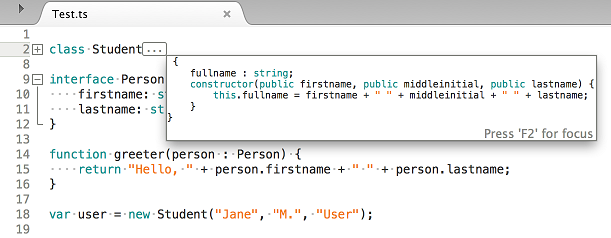
Code folding is supported for TypeScript classes, modules and interfaces.

TypeScript code folding

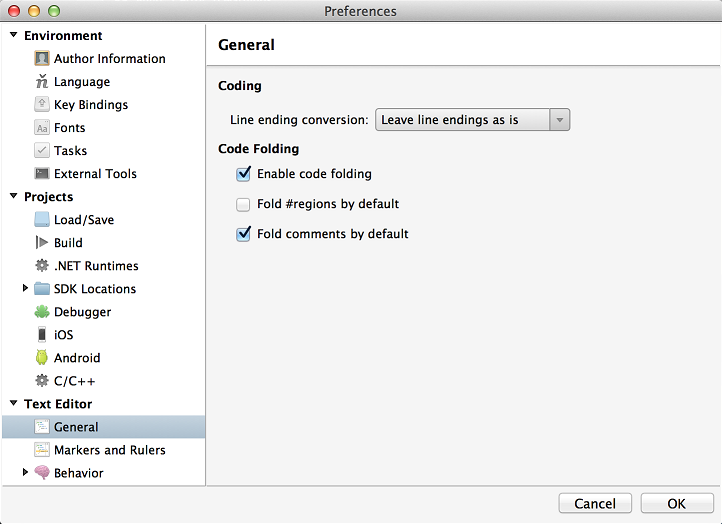
Code folding by default is disabled. To enable code folding open the Preferences dialog and in the Text Editor section select the General category, then tick the Enable code folding check box.

Preferences - Enabling code folding

Compiling to JavaScript

By default the TypeScript files will be compiled to JavaScript when the project is compiled.

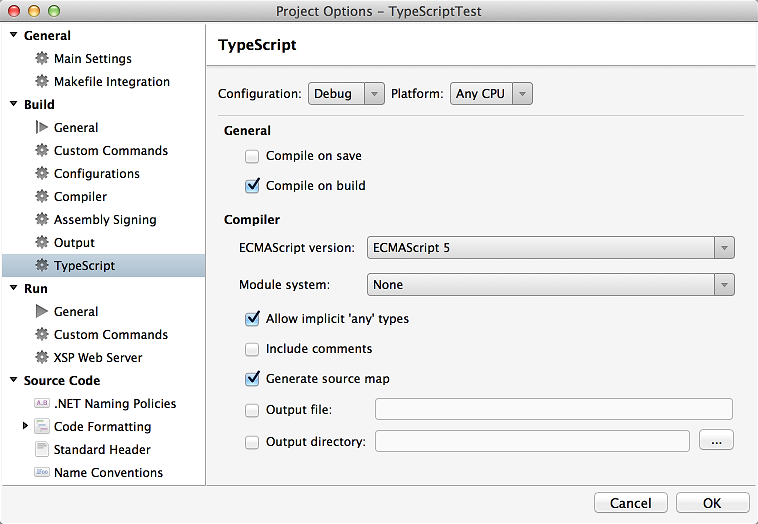
There are more compiler options available in the project options in the Build – TypeScript category.

TypeScript compiler options for the project

On this page you can change when the compiler is run and what options are passed to the compiler when generating JavaScript code.

If an Output file is specified then all the TypeScript files will be compiled into a single JavaScript file. If an Output directory is specified then the JavaScript files will be generated in that directory instead of next to the TypeScript files.

That is the end of our quick look at TypeScript support in Xamarin Studio and MonoDevelop.

Source Code

The source code for the addin and for the V8.NET engine that works on Mono are available on GitHub.

NuGet Support in Xamarin Studio 5.8

Xamarin Studio 5.8 added support for Apple’s Watch Kit and it also includes some NuGet bug fixes.

Bug Fixes

  • Allow ASP.NET project templates to work offline.
  • Build error after updating Xamarin.Forms in a project created by Visual Studio
  • Custom MSBuild task not updated after updating Xamarin.Forms
  • Update information in the Solution window incorrect after updating packages
  • Check for package updates continues after closing a solution
  • Check for package updates prevents packages from being removed
  • Incorrect error message displayed when checking for package updates
  • Exception when checking for package updates after changing target framework of a project

More information on all the new features and changes in Xamarin Studio 5.8 can be found in the release notes.

Allow ASP.NET project templates to work offline

Previously it was not possible to create an ASP.NET project without an internet connection even if all the NuGet packages were available in the local machine’s NuGet packages cache.

Now the local machine’s NuGet cache is used as the primary source of packages for project templates so it is possible to create an ASP.NET project without an internet connection if the NuGet packages are already in this cache.

This problem did not affect project templates, such as Xamarin.Forms, which include the NuGet packages with their project templates.

Build error after updating Xamarin.Forms in a project created by Visual Studio

When a NuGet package that uses custom MSBuild targets file, such as Xamarin.Forms, is added to a project by Visual Studio the project file has an extra Target added, as shown below.

<Target Name="EnsureNuGetPackageBuildImports" BeforeTargets="PrepareForBuild">
  <PropertyGroup>
    <ErrorText>This project references NuGet package(s) that are missing on this computer.
Enable NuGet Package Restore to download them.  For more information, see
http://go.microsoft.com/fwlink/?LinkID=322105. The missing file is {0}.</ErrorText>
  </PropertyGroup>
  <Error Condition="!Exists('packages\Xamarin.Forms.1.2.1.6229\build\portable-win+net45+wp80+MonoAndroid10+MonoTouch10\Xamarin.Forms.targets')" Text="$([System.String]::Format('$(ErrorText)', 'packages\Xamarin.Forms.1.2.1.6229\build\portable-win+net45+wp80+MonoAndroid10+MonoTouch10\Xamarin.Forms.targets'))" />
</Target>

When the project was opened in a previous version of Xamarin Studio, and the NuGet package is updated or removed, the Error task was not updated. The project would then fail to compile with an error being reported that the old .targets file could not be found.

Now when updating or removing a NuGet package the EnsureNuGetPackageBuildImports target is checked and the matching Error task will be removed. If there are no remaining Error tasks then the EnsureNuGetPackageBuildImports target is also removed. This prevents build errors after updating or uninstalling the old NuGet package from the project.

Note that Xamarin Studio will not add an EnsureNuGetPackageBuildImports target and will not add Error tasks to a project when a NuGet package is added or updated.

Custom MSBuild task not updated after updating Xamarin.Forms

If a project that had a reference to Xamarin.Forms was compiled once, then the NuGet package was updated, the old MSBuild task was still being used when compiling.

For Xamarin.Forms this could cause a “XamlG Task failed unexpectedly” build error to be reported. Also the Package Console would report not being able to access the Xamarin.Forms.Build.Tasks.dll when updating or removing the NuGet package.

The problem was that MonoDevelop.Projects.Formats.MSBuild.exe that compiles the project would lock the MSBuild task assembly.

Now when an MSBuild import is removed on updating a NuGet package Xamarin Studio will dispose the current project builder which will shutdown the MonoDevelop.Projects.Formats.MSBuild.exe process. This unlocks any custom MSBuild task assemblies loaded by this process, allowing the old NuGet package to be removed without any access denied errors, and when the project is recompiled again it will use the correct MSBuild task assembly.

Update information in the Solution window incorrect after updating packages

With check for updates enabled in Preferences, when an ASP.NET project is created, updates are shown as available for several packages. When the packages are updated the Solution window would still show updates as being available even though the packages had been updated.

The problem was that a change was made in Xamarin Studio 5.7 to update package dependencies at the same time as the package was updated. This meant that an update event was not fired for each package being updated which would result in some package updates being shown as available in the Solution window even when they had been updated.

Now Xamarin Studio will check all package references when a package is updated so if any package dependencies are updated the Solution window will show the correct status of the packages.

Check for package updates continues after closing a solution

Xamarin Studio will now stop checking for package updates when the current solution is closed. Previously this would continue until the check was completed.

Check for updates prevents packages from being removed

Previously when Xamarin Studio was checking for package updates all other NuGet actions, such as updating, adding or removing packages, would not be run until the check for updates had completed. Now the check for NuGet package updates is done on a separate thread so other NuGet actions can be run at the same time.

Incorrect error message displayed when checking for package updates

The Package Console would sometimes show the error message “An exception was thrown while dispatching a method call in the UI thread.” instead of the underlying error making it difficult to determine the cause of the problem. For example if there was a zero byte sized .nupkg file in the solution’s package directory, and check for updates is enabled, then the wrong error was displayed in the Package Console.

Exception when checking for package updates after changing target framework of a project

Previously a null reference exception would be reported in the Package console window when doing the following:

  1. Create a project with one NuGet package added.
  2. Create two NuGet package sources in Preferences. Disable all other package sources.
  3. Open the Add Packages dialog and select All Sources.
  4. Go back to Preferences and uncheck both of the package sources.
  5. Change the target framework of the project in the project options.

NuGet Support in Xamarin Studio 5.7

Changes

  • NuGet menus renamed to make them easier to discover
  • Solution window icons made consistent
  • Fix build errors after MSBuild target restored for package
  • Fix types imported by MSBuild target not recognised after NuGet package installed
  • Fix Solution window cannot be opened when access to NuGet.Config is denied
  • Fix updating all packages not updating dependencies
  • Fix pre-release NuGet package being downgraded on update

More information on all the new features and changes in Xamarin Studio 5.7 can be found in the release notes.

NuGet menus renamed

The menus have been changed so they now include the word NuGet to make them easier to discover.

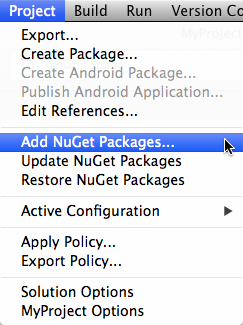
Project menu

NuGet menu items in the main Project menu

Solution context menu

NuGet menu items in the Solution context menu

Project context menu

NuGet menu items in the Project context menu

Solution Window

The warning icon used in the Solution window has been changed so it is consistent with other Solution window items.

Package not restored

Solution Window - NuGet package not restored

Solution Window - NuGet package not restored with tooltip

A new warning icon is used for packages that are not restored, the text is greyed out and hovering over the warning icon shows information about the warning.

Package installing

Solution Window - NuGet package installing

When a package is being installed the text is greyed out to indicate that the package is not currently available in the project and the text shows (installing) to distinguish between a package being installed and a package that is not restored.

Package needs retargeting

Solution Window - NuGet package needs retargeting

A new warning icon is used for packages that need retargeting. The package id text has changed to black text instead of orange. Hovering over warning icon shows a message that the package needs retargeting.

Bug Fixes

Build errors after MSBuild target restored for package

If a NuGet package had an MSBuild target that added extra references to the project then on restoring the NuGet package those references were still unavailable and the build would still fail.

This problem occurs with the MonoGame.Binaries NuGet package. The MonoGame.Binaries NuGet package has a custom MSBuild .targets file that adds extra references:

<Project ToolsVersion="4.0" xmlns="http://schemas.microsoft.com/developer/msbuild/2003">
  <ItemGroup>
    <Reference Include="MonoGame.Framework">
      <HintPath>$(MSBuildThisFileDirectory)\MonoGame.Framework.dll</HintPath>
    </Reference>
    <Reference Include="Tao.Sdl">
      <HintPath>$(MSBuildThisFileDirectory)\Tao.Sdl.dll</HintPath>
    </Reference>
    <Reference Include="OpenTK">
      <HintPath>$(MSBuildThisFileDirectory)\OpenTK.dll</HintPath>
    </Reference>
  </ItemGroup>
</Project>

If the MonoGame.Binaries NuGet package is not available on opening the project in Xamarin Studio the project will fail to build after restoring the NuGet package since the references in the MSBuild targets file were not being refreshed.

Now after a NuGet package restore the MSBuild host used by Xamarin Studio is refreshed which allows the references in the MSBuild targets file to be found and the project to compile without any build errors.

Types imported by MSBuild target not recognised after NuGet package installed

If a NuGet package had an MSBuild target that added extra references to the project then on installing the NuGet package the types from those references were still unavailable to Xamarin Studio and would be highlighted in red in the text editor. To fix this the solution had to be closed and re-opened. This problem occurs with the MonoGame.Binaries NuGet package.

Now after a NuGet package is installed and it contains a MSBuild targets file then Xamarin Studio’s type system will be refreshed for that project. The types will then be known by Xamarin Studio and no longer be highlighted in red in the text editor.

Solution window cannot be opened when access to NuGet.Config is denied

If the NuGet directory containing the NuGet.Config file cannot be created or read by NuGet then an exception is thrown. This exception was not being handled by Xamarin Studio and would prevent the solution window from opening.

Now if there is any error creating this directory, or trying to load the NuGet.Config file, then the exception is caught which allows the Solution window to open. If the NuGet directory containing the NuGet.Config file cannot be created then it will not be possible to use NuGet in Xamarin Studio but it will not prevent the solution pad from being used.

Updating all packages not updating dependencies

Updating NuGet packages for the entire solution would not install the Xamarin.Android.Support.v13 NuGet package which was added as a new dependency to the Xamarin.Android.Support.v4 NuGet package.

The problem was that the NuGet package update was not configured to update any NuGet package dependencies when updating all packages in the solution. Updating all packages in the project or the NuGet package individually would update package dependencies correctly.

Note that this fix has introduced a bug where Xamarin Studio will show updates as available even though the updates have just been installed for the solution. This new bug should be fixed in Xamarin Studio 5.8.

Pre-release NuGet package being downgraded on update

When a pre-release NuGet package was installed that was newer than the latest stable NuGet package available then updating the package would install the stable version even though it was a lower version. Now an explicit check is made to ensure that an older NuGet package is not being installed.

Installing Portable Class Libraries for Xamarin Studio

In order to use Portable Class Libraries (PCLs) with Xamarin Studio you need to have the following installed:

  • Portable Class Library Reference Assemblies.
  • Portable Class Library MSBuild targets.
  • Xamarin’s Portable Class Library Profiles.

If you do not all of the above installed then you may run into the following problems when using Xamarin Studio.

  1. Unable to create a Portable Library project since the project template is not available.
  2. Unable to install a NuGet package, such as Json.NET, that contains PCL assemblies into an Android or iOS project. Example error message below:

    Could not install package ‘Newtonsoft.Json 6.0.6’. You are trying to install this package into a project that targets ‘MonoAndroid,Version=v4.4’, but the package does not contain any assembly references or content files that are compatible with that framework. For more information, contact the package author.

On the Mac the Portable Class Libraries for Mono 3.10.0 are installed into the directory:

/Library/Frameworks/Mono.framework/Versions/3.10.0/lib/mono/xbuild-frameworks/.NETPortable

On Windows the Portable Class Libraries are installed into the directory:

C:\Program Files (x86)\Reference Assemblies\Microsoft\Framework\.NETPortable

So let us take a look at how to install everything required to get PCLs fully supported within Xamarin Studio.
Mac – Installing Portable Class Libraries

The Portable Class Libraries are included with the Mono Development Kit (MDK) but not with the Mono Runtime Environment (MRE). If you are installing Mono yourself instead of using Xamarin’s Universal Installer then you will want to install the MDK instead of the MRE. The MDK includes the MRE as well as extra tools, libraries and the .NET Portable Class Library profiles.

If Mono is updated from within Xamarin Studio using Check for updates then the MDK should be installed.

Windows – Installing Portable Class Libraries

Xamarin Studio on Windows uses Microsoft’s .NET Framework instead of Mono so the Portable Class Libraries need to be installed separately. To install the Portable Class Libraries on Windows you have three options:

  1. Install Visual Studio 2013 (full or Express version). Update 2 or above is required.
  2. Install the Portable Library Tools and the Portable Library Reference Assemblies 4.6.
  3. Install the Portable Library Tools and copy the .NETPortable directory from Mono over to Windows.

If you do not want to install Visual Studio 2013 then you should look at options 2 or 3.

One problem with option 2 is that not all the .NET Portable profiles, such as Profile 259, will be installed. The full list of what .NET Portable profiles are installed by each of the installers listed above is available from the .NET Portable Profiles page

Let us take a look in more detail at the option 2 since this has a few manual steps.

Windows – Installing the Portable Library Tools and the Portable Library Reference Assemblies 4.6

Before you start make sure Xamarin Studio is not running.

Download the Portable Library Tools.

To install the Portable Library Tools open a command prompt where PortableLibraryTools.exe was downloaded and run:

PortableLibraryTools /buildmachine

Download the Portable Library Reference Assemblies 4.6 and run the NetFx_PortableLibraryReferenceAssemblies46.msi installer. This will install a PortableReferenceAssemblies.zip file into the directory:

C:\Program Files (x86)\Microsoft .NET Portable Library Reference Assemblies 4.6

This PortableReferenceAssemblies.zip file contains three directories (4.0, 4.5 and 4.6) which need to be extracted and copied into the PCLs directory:

 C:\Program Files (x86)\Reference Assemblies\Microsoft\Framework\.NETPortable

The PortableReferenceAssemblies.zip file contains files which already exist in the above folder and you should replace the existing files with the new versions from the .zip file.

If you installed Xamarin Studio before you installed the Portable Class Libraries you will now need to reinstall the Xamarin PCL profiles. The Xamarin PCL profiles will only be installed if the Portable Class Libraries were already installed. The simplest way to do this is to find Xamarin in the Control Panel’s Programs and Features, right click it and select Repair.

Repairing Xamarin in Programs and Features

This will add a set of Xamarin .xml files into the profiles that are compatible with the Xamarin frameworks. For example looking at the Profile78 directory we see:

C:\Program Files (x86)\Reference Assemblies\Microsoft\Framework\.NETPortable\v4.5\Profile\Profile78\SupportedFrameworks
  • .NET Framework 4.5.xml
  • Windows 8.xml
  • Windows Phone Silverlight 8.xml
  • Xamarin.Android.xml
  • Xamarin.iOS.xml

Now you should have full support for Portable Class Libraries in Xamarin Studio.

Xamarin Components and NuGet

Xamarin Studio 5.5 and Xamarin for Visual Studio 3.7 have support for Xamarin Components with NuGet package dependencies. So you can now have Xamarin Studio or Visual Studio add NuGet packages to a project when a Component is installed from Xamarin’s Component Store.

The NuGet Support in Xamarin Studio 5.5 post looked at installing a Component with a NuGet package dependency into a project but did not cover how to create one of these Components. So let us take a look at how to modify an existing Component so it has NuGet package dependencies.

Adding a NuGet Package Dependency to a Component

In this section we will look at modifying a Component so when it is installed it adds NuGet packages to the project as well as referencing the assemblies that are included in the Component.

First download the latest version of the xamarin-component command line application which has been updated to support Component’s with NuGet packages dependencies.

The downloaded xpkg file is a zip file containing xamarin-component.exe. So rename the file to have a .zip file extension and then extract the executable.

Now let us see how to add a single NuGet package dependency to the Component. If you are using a component.yaml file to generate your Component you can add the NuGet package dependency by adding the following to your component.yaml:

packages:
  "": Newtonsoft.Json, Version=5.0.8

With the above defined in your component.yaml file you can run the xamarin-component.exe package command to generate your Component’s .xam file.

Windows:

xamarin-component.exe package path\to\directory-with-component-yaml

Mac:

mono xamarin-component.exe package path/to/directory-with-component-yaml

If you then look inside your generated Component file (.xam), which you can do by renaming its file extension to .zip, you will see the package defined in the component/Manifest.xml file:

<packages>
  <package id="Newtonsoft.Json" version="5.0.8" />
</packages>

If you are using the xamarin-component.exe create-manually command line you can add the same NuGet package dependency by adding the following command line argument:

--package="":"Newtonsoft.Json, Version=5.0.8"

This packaged Component will install the Newtonsoft.Json NuGet package into any Android, iOS or Windows Phone project. If you need to install a particular NuGet package for a particular project type you can specify the target project type for the NuGet package dependency. Shown below is a more complicated example from a component.yaml file where NUnit and Newtonsoft.Json are configured so they will only be installed into Android projects, whilst log4net is only installed into iOS projects, and finally Ninject will be installed into all project types.

packages:
  android:
    - NUnit, Version=2.6.2
    - Newtonsoft.Json, Version=5.0.8
  mobile: Ninject, Version=3.2.0
  ios: log4net, Version=2.0.0
  ios-unified: log4net, Version=2.0.0

Note that mobile used here is equivalent to the empty double quoted string “” which was used in the previous example with the single NuGet package.

If you then generate the Component again using the xamarin-component.exe package command you will see the Component’s manifest file now contains the following:

  <packages>
    <package id="NUnit" version="2.6.2" framework="android" />
    <package id="Newtonsoft.Json" version="5.0.8" framework="android" />
    <package id="log4net" version="2.0.0" framework="ios" />
    <package id="log4net" version="2.0.0" framework="ios-unified" />
    <package id="Ninject" version="3.2.0" framework="mobile" />
  </packages>

If you are using the xamarin-component.exe create-manually command line you can add the same NuGet package dependencies to your Component by adding the following command line arguments:

--package="android":"NUnit, Version=2.6.2"
--package="android":"Newtonsoft.Json, Version=5.0.8"
--package="mobile":"Ninject, Version=3.2.0"
--package="ios":"log4net, Version=2.0.0"
--package="ios-unified":"log4net, Version=2.0.0"

With the NuGet package dependencies defined as shown in the previous examples when you install the Component into a project the NuGet package will be installed and a reference will be added to the assemblies in the lib directory of the Component. If you want to only add the NuGet package to the project and not the assemblies in the lib directory then you can create a Shell Component which we will look at in the following section.

Creating a Shell Component

A Shell Component is special type Component that is basically a wrapper around one or more NuGet packages. It will only install the NuGet package into the project and not add references to any assemblies in the Component’s lib directory.

To configure a component to be a Shell Component you can add the following to your component.yaml file:

is_shell: true

When you generate your Component’s .xam file you will see that the Component’s Manifest.xml file now contains the is-shell attribute in the component element:

<component format="1" id="mycomponent" is-shell="true">

If you are using the xamarin-component.exe create-manually command line argument you can do the same thing by passing the following argument:

--is-shell

Backwards compatibility is something to consider if you decide to create a Shell Component. If you need a Shell Component to work with older versions of Xamarin Studio and Xamarin for Visual Studio that do not support Component’s with NuGet package dependencies then you should also include the assemblies in the lib directory of the Component. The Android Support Library v13 Component is one example that has a NuGet package dependency and also includes an assembly in its lib/android directory. When installing the Android Support Library v13 Component into an older version of Xamarin Studio the NuGet package will not be installed and instead the assembly will be referenced from the Component’s lib/android directory. If the Android Support Library v13 Component is installed with Xamarin Studio 5.5 or above then the NuGet package will be installed but the assembly from the lib/android directory will not be referenced.

NuGet Package Sources

The NuGet package dependencies that a Component has must be available from the official NuGet Gallery before your Component is submitted to the Component Store.

If you are testing a NuGet package that is not currently available from the official NuGet Gallery then you can copy it into the local machine’s NuGet cache directory. Xamarin Studio and Xamarin for Visual Studio should find the NuGet package in the local NuGet cache instead of trying to download it from the NuGet Gallery.

Creating a Component

There are some example Component’s that have NuGet package dependencies available on my GitHub page. The Awesome Component example is a Shell Component that uses a rakefile and the xamarin-component create-manually command line to generate the Component. The My Component example is another Shell Component that uses a component.yaml file that defines NuGet package dependencies.

For more detailed information on how to create a Component please see the Submitting Components page.

NuGet Support in Xamarin Studio 5.5

New Features

  • Package version constraints in packages.config files are now supported
  • Xamarin Components can now have NuGet package dependencies

More information on all the new features and changes in Xamarin Studio 5.5 can be found in the release notes.

NuGet Package Version Constraints

NuGet allows you to define a range of package versions that are allowed in your project using the allowedVersions attribute in the packages.config file.

<packages>
  <package id="Newtonsoft.Json" version="5.0.1" allowedVersions="[5.0,6.0)" targetFramework="MonoAndroid44" />
</packages>

In the above packages.config file the project has Json.NET 5.0.1 installed and will only allow updates to versions of Json.NET that are below 6.0.

When you open the solution in Xamarin Studio, and check for updates is enabled in preferences, you will see updates in the Solution window that are valid given the constraint defined in the packages.config file. In the screenshot below an update is shown for Json.NET 5.0.8 in the Solution window even though Json.NET currently has version 6.0.5 available.

Json.NET 5.0.8 package update available shown in Solution window

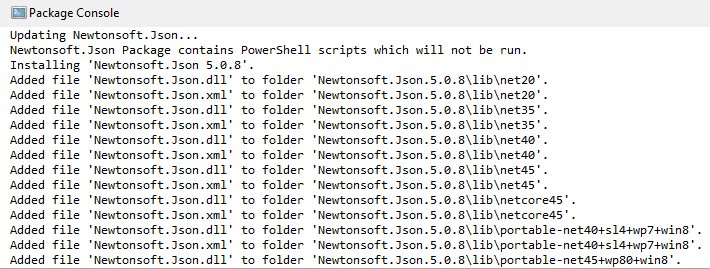
When you update the NuGet packages from the Solution window Xamarin Studio will now update to a NuGet package that meets the version constraints defined in the packages.config. In the Package Console screenshot below the Json.NET package was updated, with the constraint in place, and Json.NET 5.0.8 was installed.

Json.NET package updated to 5.0.8 - Package Console output

Note that if you install a NuGet package from the Add Packages dialog you can override the constraint and install a NuGet package with a version outside of the range of the constraint.

Components with NuGet Packages

A Component from Xamarin’s Component Store can now declare a dependency on one or more NuGet packages which will be installed into the project when the Component is installed. The Android Support Library v13 Component is one example that has a NuGet package dependency.

Android Support Library v13 Component in Component Store

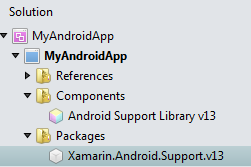
When you install this Component you will see that it installs the Xamarin.Android.Support.v13 NuGet package.

Android Support Library v13 Component in Solution window

In older versions of Xamarin Studio the NuGet package will not be installed and instead the project will reference the Xamarin.Android.Support.v13.dll which is included with the Component.

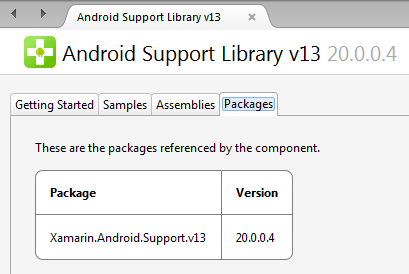
The NuGet packages a Component depends on are displayed in the Packages tab on the Component Details page, which you can open by double clicking the Component in the Solution window, or by right clicking the Component and selecting Details.

Android Support Library v13 Packages in Component Details page

From the Packages tab you can also install a NuGet package that a Component depends on if it was removed from the project. So if the Xamarin.Android.Support.v13 NuGet package is removed from the project the Component will be highlighted in red to indicate that there is a problem.

Android Support Library v13 Component error in Solution window

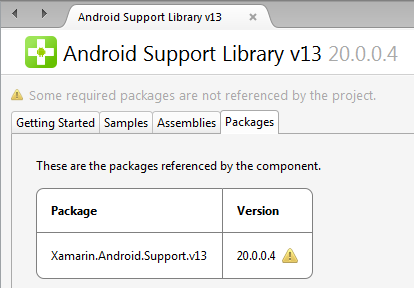
If you then open the Component Details page you will see in the Packages tab that the NuGet package is missing.

Android Support Library v13 CComponent Details page with missing NuGet Package

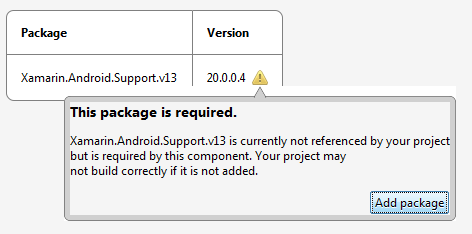
To add the NuGet package back to the project you can hover the mouse over the warning icon and click the Add Package button that appears in the pop-up window.

Android Support Library v13 CComponent Details page with Add Package pop-up window